The aim of this post is to help you train a deep learning model that can detect cats — the classic example with which one usually starts their deep learning journey. An equally important aim is to do that in 5 lines of code.
TL;DR: That’s it. 5 lines of code to detect cats! Try running this on collab with your own ‘cat’ or ‘non-cat’ image.
Computer programs to detect cats-and-dogs were of much interest at the dawn of AI. According to this paper, ML based cat-vs-dog classifiers back in the days were so bad (~55% accuracy). We’ve come a long way since and no one really cares about the SOTA for a cat classifier these days — we’ve moved on to more challenging tasks. Nevertheless many deep learning courses start with an “easy” example such as a cat classifier.
In the code snippet above, we have used the fastai deep learning library to make our lives simpler. Fastai is a layered API sitting on top of PyTorch, meaning you can “tear down” the code in layers to reveal the (pure PyTorch and fastcore) implementation beneath. Fastai is doing many things for us behind the scenes. It can be summarized as:
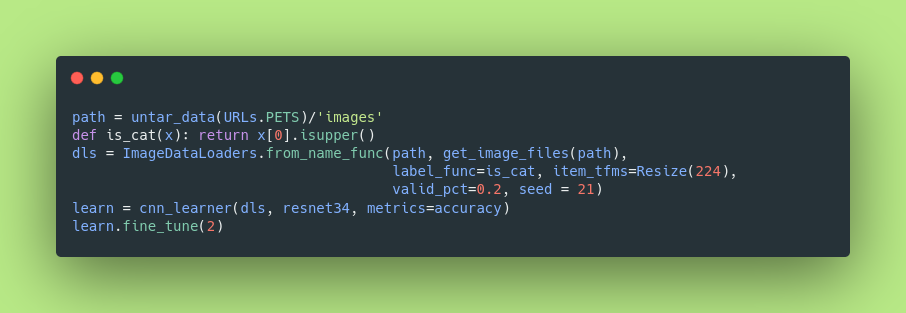
- Get the data: The first line of code
path = untar_data(URLs.PETS)/'images'essentially downloads and extracts the Oxford-IIIT pets dataset containing images of 37 classes of pets (including cats). The path to the images is stored as a PosixPath object. - Set label for cat and non-cat images: The line
def is_cat(x): return x[0].isupper()tells our program if a given image is a cat or not. The makers of this dataset did a neat trick to make this easy for us. If the name of the image file starts with a capital letter, then it is a ‘cat’. Otherwise, it is a ‘non-cat’ (we don’t care about other classes of pets since our aim is to detect only cats). - Load data: The next line prepares our data into batches of tuples
(InputImage, TargetLabel)for the GPU to consume. This is done by theImageDataLoadersclass. We provide it with the path to find all our images, a function to find and gather images, the label function (from above). We have to also pass a list of transforms that we would like to apply to our images. In this case, weResizeeach image to224x224, so that it can be batched into the GPU. Optionally we pass thevalid_pctargument, which tells the program what percent of the input data should be used astrainandvaliddatasets. Here, we say we want to keep aside20%of the input as our validation split. Finally theseedargument makes everything reproducible. - Setting up the architecture and evaluation metric: Here we pass our data, specify our model-
bodyasResNet34and use theaccuracycnn_learneris yet another abstraction over the mid-level API of fastai that callsLearnerwith fastai defaults for the optimizer, learning rate and other hyperparameters. What it also does is that it automatically attaches ahead, identifies a loss function and number of output activations (2 in this case —Falsefor non-cat,Truefor cat) for our model from the input data types! - Training the model: The final step in our 5-line classifier is to train the model and see how it performs. This is achieved by the
fine_tunemethod. We are essentially doing transfer learning; sofine_tunecarefully starts the training by freezing the body of the model for 1 epoch and then unfreezing it for the remaining/requested epochs.
Fastai will also print the training progress, letting us know the train and valid loss along with the performance metric we asked for. And that’s it folks! We have successfully trained a deep learning model in 5 lines of code, thanks to the high-level abstraction of PyTorch and rapid prototyping methods offered by fastai.
It is now time for you to play with this on collab. Enjoy!
P.S. But the real question is, does this model really really understand the difference between a cat and a dog. More on that in this book.


